Stephen Martin, Sr. Staff Consultant @ Nutanix | September 2025
Introduction
Microsegmentation is one of the best defenses against ransomware and data breaches. However, implementing microsegmentation can be a very intimidating undertaking, and there are two main impediments to getting started that I encounter when working with clients. They are:
- “Microsegmentation products are hard to understand and use.”
- “We don’t know all the ways our servers communicate, so we wouldn’t know where to begin writing rules.”
Flow Network Security is the solution to both concerns. Our easy-to-understand Application-Centric Policy Model makes building policies and rules easy for anyone, even if you’re starting from scratch. In this post, I’ll walk through creating an FNS Application Policy, giving you an easy, repeatable process that you can use to start building your first policy and carry forward as you work to secure your entire Nutanix footprint.
To set some expectations, we’re not going to be focused on the specific clicks in the interface as much as the outcome of the clicks. Also, we’re going to be using some features that were introduced in Prism Central 7.3 and Flow Network Security 5.2.
If you would like more in depth information than what is covered here, I have another post that takes a deeper look at FNS.
Flow Network Security: What and Why?
You’re probably already familiar with microsegmentation and its benefits on some level: traditional firewalling is only from network to network and doesn’t provide any protection between machines on the same network. That’s where Flow Network Security comes in, providing easy to use, fully distributed, line-rate, VM-to-VM firewalling that works on any Nutanix AHV environment (on-premise AND NC2). To break that down a bit:
- Easy to Use – Our interface is designed to be easy to understand and use for everyone, breaking down barriers between security teams and application owners.
- Fully Distributed – FNS runs at the hypervisor level, allowing policy to be enforced efficiently and at scale.
- Line-Rate – FNS is efficient, providing security without slowing you down.
- VM-to-VM – FNS rules act on traffic at the VM vNIC level, allowing you control traffic between VMs even on the same network.
So why do we need Flow Network Security? What do we gain from a fully distributed, line rate, VM-to-VM firewall? Plainly speaking, properly configured microsegmentation is one of the best defenses against the spread of malware/ransomware. These exploits are built to quickly move laterally within a subnet, looking for ways to move to other networks. With Flow Network Security, you can ensure that only your essential business traffic is allowed, closing the holes that unwanted/unused services can create. So now that we know the what and why, let’s talk about the how.
Application Policy 101
Let’s start by developing an understanding of what an Application Policy is, and what the main components are.
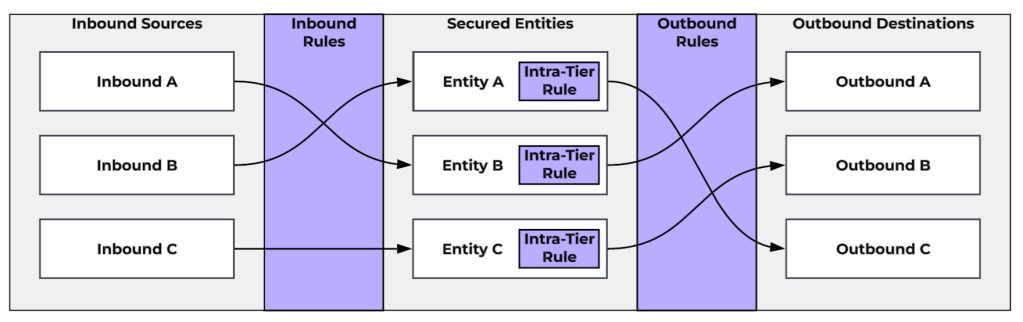
In our Application-Centric Policy Model, we take the approach where, instead of a single monolithic list of firewall rules for your entire environment, we manage security policies on a per-application basis. Application Policies define an application as a collection of Secured Entities that represent the discrete functions/components of the application. For example, say we have a three-tier application called PubSite. Our secured entities would be our PubSite Web Servers, our PubSite App Servers, and our PubSite DB Servers. These entities are going to be defined as a category (or the union of multiple categories) or Entity Group1 which includes the specific VMs involved in that tier/function of the application. For each Secured Entity, there is an Intra-Tier Rule that defines whether the VMs in the Secured Entity can talk to each other, and if so, how2. Keep in mind, this Intra-Tier Rule does mean you need to be cautious about creating overly large Secured Entities. You need to keep your Secured Entities small and focused enough that you are comfortable with an allow or deny rule between all of the VMs within the entity.
A policy also includes lists of Inbound Sources and Outbound Destinations. These can be either VMs, Subnets3, VPCs4, Entity Groups, Address Groups, Network Addresses (ad hoc/one-off addresses that don’t necessarily require creation of a reusable Address Group) or Allow All (meaning all IPs).
Finally, the policy is composed of Inbound Rules, which are mappings of an Inbound Source to a Secured Entity with the list of allowed ports and protocols, as well as Outbound Rules, which are mappings of a Secured Entity to an Outbound Destination, with the list of allowed ports and protocols.
It’s important to remember that, once you secure an application and its constituent VMs with Flow Network Security, only the traffic that you explicitly define via inbound, outbound, and intra-tier rules will be allowed for those VMs. This means you also need to define rules to allow for administrative access (such as SSH or RDP), infrastructure services (such as monitoring, logging, DNS, NTP, or Active Directory), and any outbound internet access required by those servers.
Some additional information to keep in mind regarding how these policies are applied: An Application Policy is creating microsegmentation rules for the VMs within the Secured Entities only. The Inbounds and Outbounds are merely referenced in these rules. Also, these are stateful rules, meaning that an Inbound rule allows both the incoming traffic and the response. However, if you need to allow traffic between Secured Entities within the same application, such as between a web tier and a database tier, you need to create an Outbound rule for the web tier as well as an inbound rule for the database tier, as this traffic is inspected at both places.
With that in mind, let’s talk about the process for building successful policies.
A First Look at the Process
Successful FNS implementations generally follow a tried-and-trusted phased approach. The first step is environment discovery, taking inventory of the VMs and identifying the applications they host. From there, we want to categorize and group the VMs in a way that allows for efficiently targeted policies.
When we’re ready to secure an application, we start by monitoring the traffic, using the observed data to build our policy rules. When we believe we’ve identified the required traffic, we enforce the policy in a testing window. Once we’ve successfully secured our application, we repeat this process of discovery, categorization, monitoring, and enforcement to secure additional applications.
Let’s go through these phases for our example from above, our three-tier PubSite application.
Discovery & Categorization
The first step is to take an inventory of our VMs and identify those VMs that we need to account for in our policy. In our case, we have identified 12 VMs that are used for our application. The first six are for our production environment. They are PRODWEB01, PRODWEB02, PRODAPP01, PRODAPP02, PRODDB01, and PRODDB02. We also have six for our Development environment, DEVWEB01, DEVWEB02, DEVAPP01, DEVAPP02, DEVDB01, and DEVDB02.
We can start categorizing and grouping these applications. Categories are labels that identify specific aspects or classifications of VMs. In this case, we need to group these VMs by three different classifications: Application,Environment, and Tier. We can create the following categories:
- Application:PubSite
- AppTier:Web, AppTier:App, and AppTier:DB5
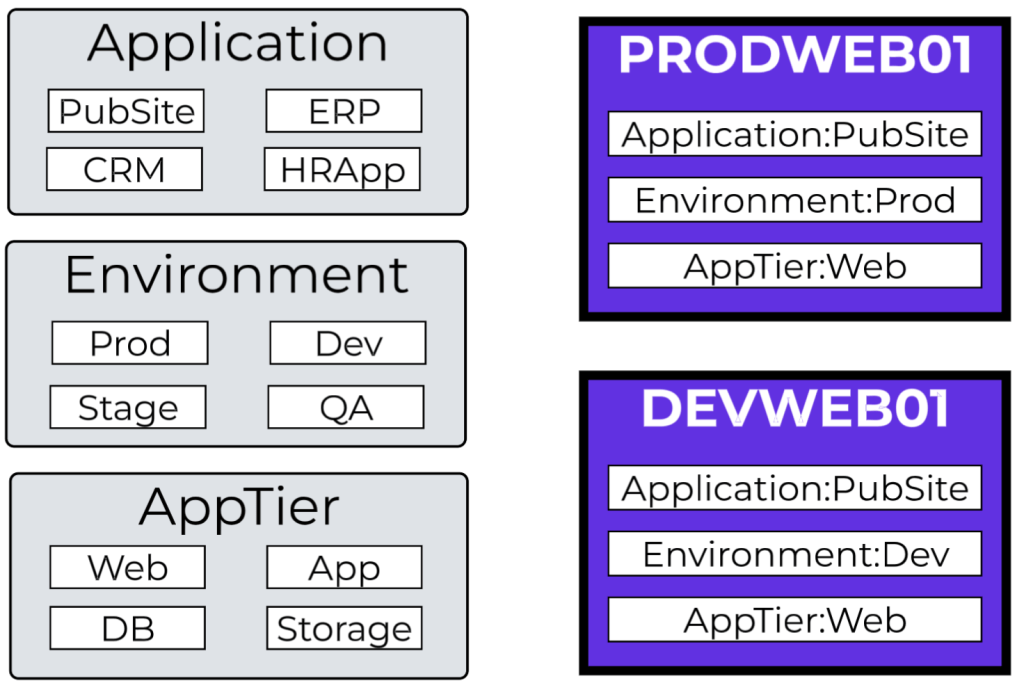
We can also use the following built-in categories:
Environment:Production and Environment:Dev
With our categories determined, we can assign them to our VMs:
- All 12 servers get the Application:PubSite category
- Our 6 PROD servers get the Environment:Production category.
- Our 6 DEV servers get the Environment:Dev category.
- Our 4 WEB servers get the AppTier:Web category.
- Our 4 APP servers get the AppTier:App category.
- Our 4 DB servers get the AppTier:DB category.
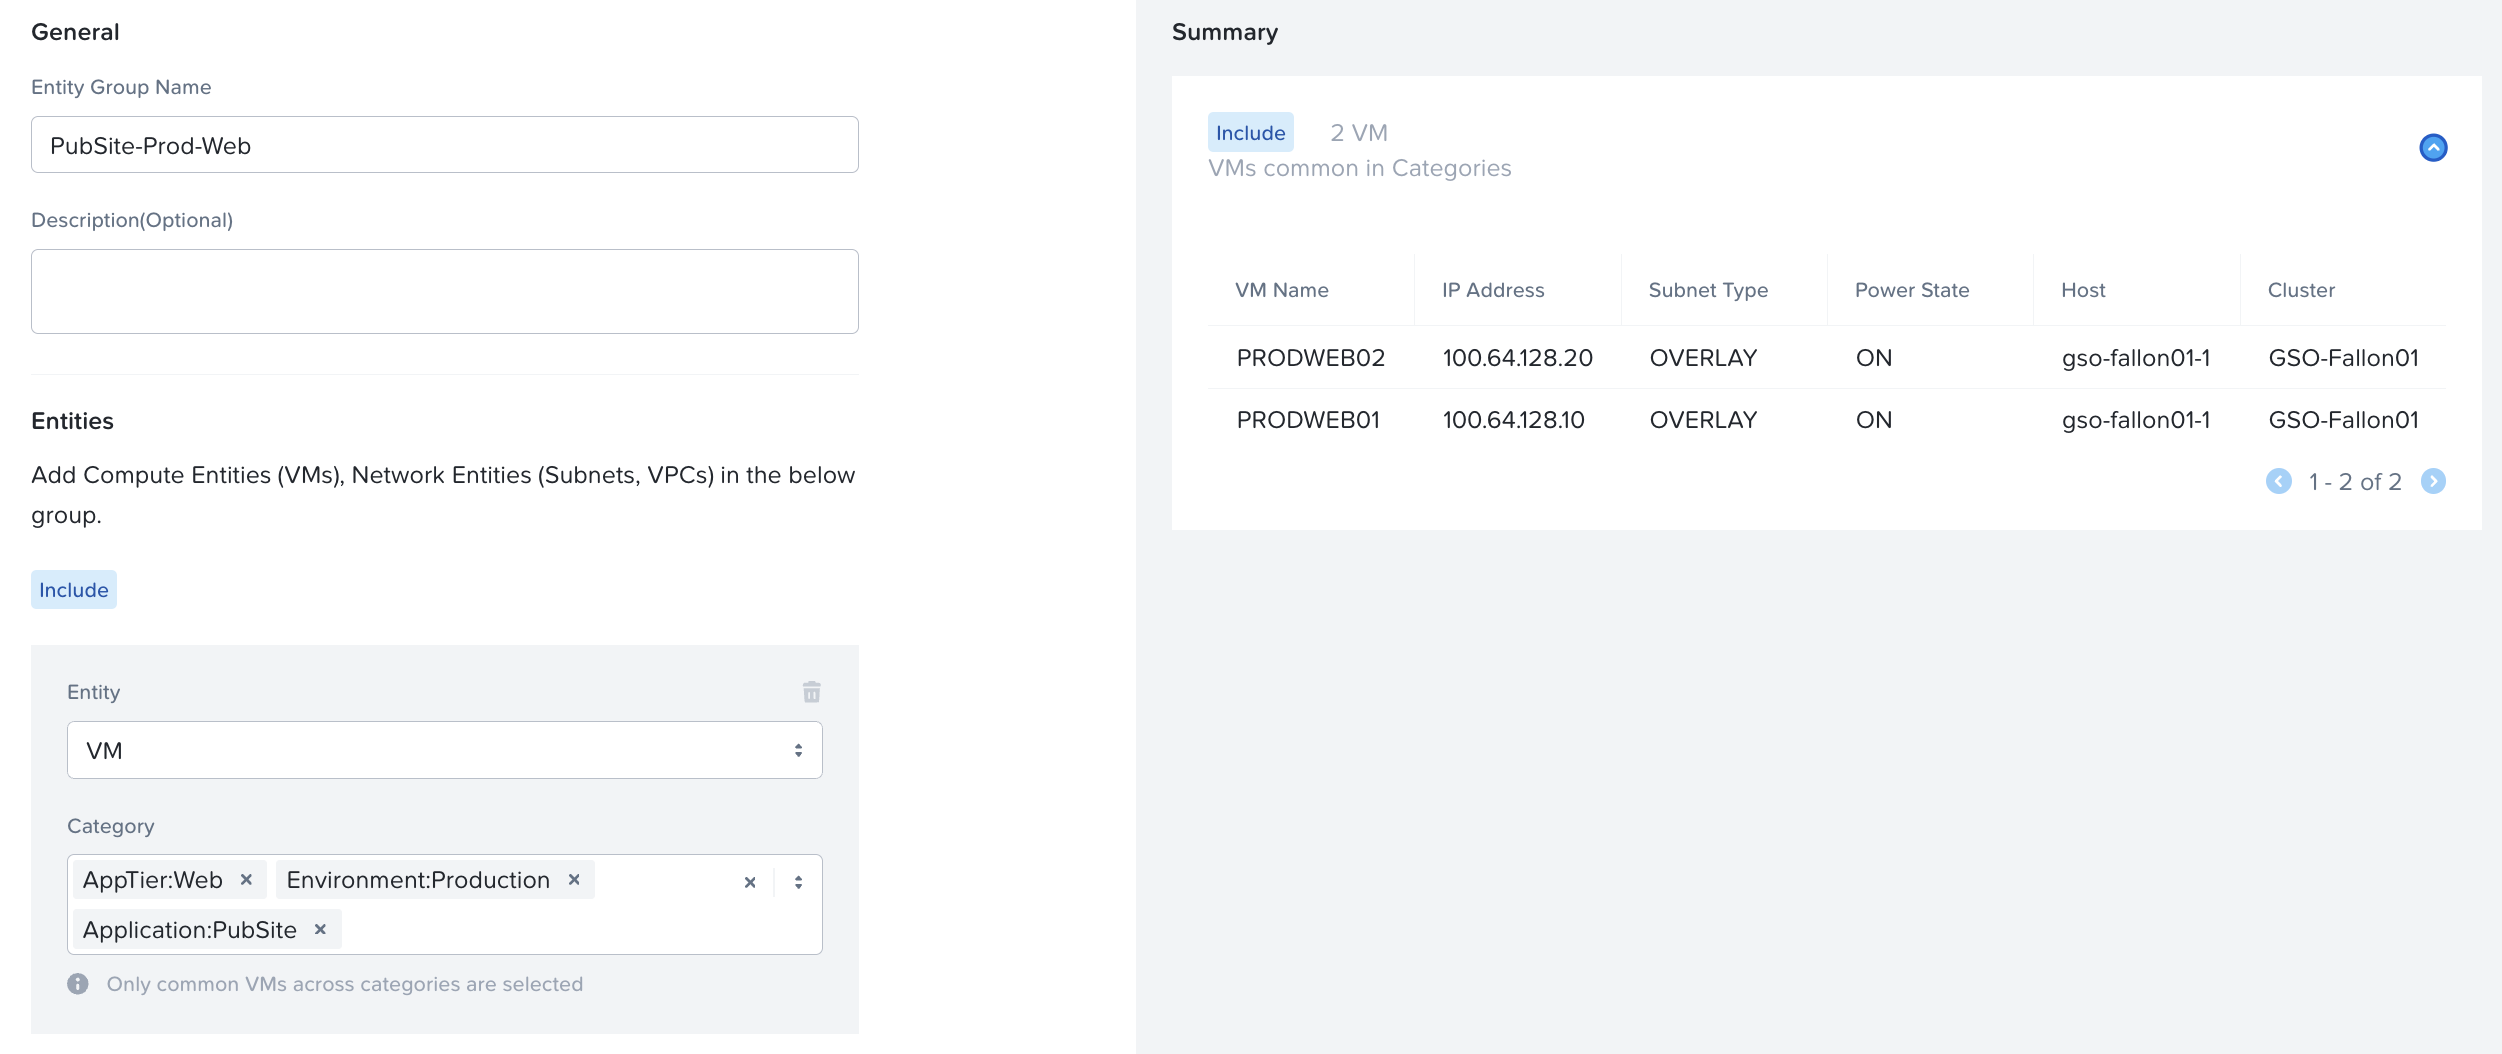
Next, we can create Entity Groups that will help us target specific the specific servers. Entity Groups are new constructs that allow us to filter to VMs that match multiple categories. For instance, we can create an Entity Group called PubSite-Prod-Web based on the categories Application:PubSite, Environment:Production, and AppTier:Web. This will allow us to specifically target our PRODWEB01 and PRODWEB02 servers, as well as ensuring that any future servers assigned those three categories will automatically be included in our group and policy.
In all, we can create the following Entity Groups matching the given categories:
- PubSite-Prod-Web – Application:PubSite, Environment:Production, AppTier:Web
- PubSite-Prod-App – Application:PubSite, Environment:Production, AppTier:App
- PubSite-Prod-DB – Application:PubSite, Environment:Production, AppTier:DB
- PubSite-Dev-Web – Application:PubSite, Environment:Dev, AppTier:Web
- PubSite-Dev-App – Application:PubSite, Environment:Dev, AppTier:App
- PubSite-Dev-DB – Application:PubSite, Environment:Dev, AppTier:DB
We also talked about how we need to account for additional traffic such as management, monitoring, infrastructure services, and outbound internet. We have two Monitoring VMs, MON01 and MON02, and a logging server, SYSLOG01. We can create Application:Monitoring and Application:Logging and assign those categories to the respective servers. Our DNS servers are 172.16.0.10 and 172.16.1.10, and our NTP servers are 172.16.0.11 and 172.16.1.11. We talk to our application team and system administrators and identify that our management traffic comes from a specific subnet, 172.16.99.0/24. We’ll create network address groups for DNS Servers, NTP Servers, and Management Subnet.
With this, we have all the components of our application defined, along with the other internal resources they need to communicate with. At this point, ideally, we would also have documentation on how these elements communicate. Some of this we already know just by the nature of what they are. For example, we communicate to DNS servers via TCP/53 & UDP/53, and we’ll communicate to NTP servers via UDP/123. However, maybe we don’t know the exact ports needed between the application tiers yet. We’ll talk through how to handle this as we start building the policy.
Know your Goals, Establish your Guidelines
There are different choices you might make when building policies, and so I’m going to walk you through some of the questions I ask clients to ensure they are making the choices that are best for them.
More Secure or Zero-Trust?
One of the first questions I ask a client when I’m meeting with them is always “What is your goal in implementing microsegmentation?” The answer generally lands in one of two camps and will strongly inform the approach we take when designing policies.
The first is “I want to protect my vital servers and data.” These organizations understand that they have high-value applications with important data, and their goal is to protect those specific applications and their data. They aren’t necessarily looking to fully implement microsegmentation, but they understand that, for instance, a ransomware incident spreading to those vital servers would be catastrophic. These organizations might focus only on policing inbound traffic to their protected applications and leaving outbound traffic from our application open.
The second is “I am looking to implement a Zero-Trust security posture.” These are organizations looking to fully lock down their environment, allowing only explicitly defined traffic and blocking everything else. These organizations are going to want every VM in their environment to be subject to a security policy, and those security policies to explicitly define inbound AND outbound traffic.
Let me be clear: both approaches are 100% valid! There’s an old saying: Don’t let perfect be the enemy of good. I’ve heard many organizations say, “We don’t have the manpower to implement a full Zero-Trust security posture, so we can’t use microsegmentation,” and it makes me want to tear my hair out. Yes, every organization’s long-term goal SHOULD be Zero-Trust! However, you have to start somewhere, and building policies to prevent unwanted traffic to your vital servers in data is a perfect, and more importantly, manageable way to start! For our policy, we’ll build outbound rules as well for completeness’ sake.
Single-Site or Multi-Site: Categories or Address Groups?
When you design policy, we need to consider where our sources and destinations are, and where they might end up. When referencing VMs by category or entity groups, we are limited to the VMs that are managed by our Prism Central. Therefore, we need to consider disaster recovery scenarios and how those might affect our policies.
Consider a policy that, because of the categories selected, allows inbound traffic from VM-1 to our secured entity VM-2. If VM-1 were to be failed over to another availability zone (and therefore another Prism Central’s management), this policy would, in a manner of speaking, lose sight of VM-1, as our local Prism Central would no longer have VM-1 in inventory or be aware of the IP addresses assigned to VM-1. In this scenario, where it is possible that a DR event might separate VM-1 and VM-2, it would be better to reference VM-1 by way of Network Address Groups that could account for VM-1’s potential differing IP addresses during standard operation as well as DR failover. If, however, VM-1 and VM-2 will ALWAYS failover together and will ALWAYS be managed by the same Prism Central, you can continue to use categories and/or entity groups for your inbounds and outbounds.
Template Policies: What Applies to Everything?
In our Discovery & Categorization phase, we identified that our application is going to accept inbound traffic from monitoring and management servers as well as send outbound traffic to a log collector, DNS servers, and NTP servers. I would ask my client “Do these apply to multiple applications?” If the answer is yes, I would advise them to build template policies that already have those inbounds, outbounds, and rules defined. Every policy would then start as a clone of the template, saving time. I recommend creating a PolicyTemplate:Placeholder1/2/3 categories and building a template policy with those placeholders as secured entities. From there, you can clone your policy, replace the placeholder entities with the real entities, and if you have fewer than 3, delete the extra.
Securing our Application
Build and Monitor
With our application elements defined, we can start securing the application itself. While you can absolutely include both production and development environments in a single policy, we’ll look at building policies for each. We’re going to start with our policies in Monitor Mode. Monitor Mode lets us define our policy and rules but not actually block any traffic. Monitor Mode will observe the traffic and advise you of any traffic that would be blocked if the policy were to be enforced.
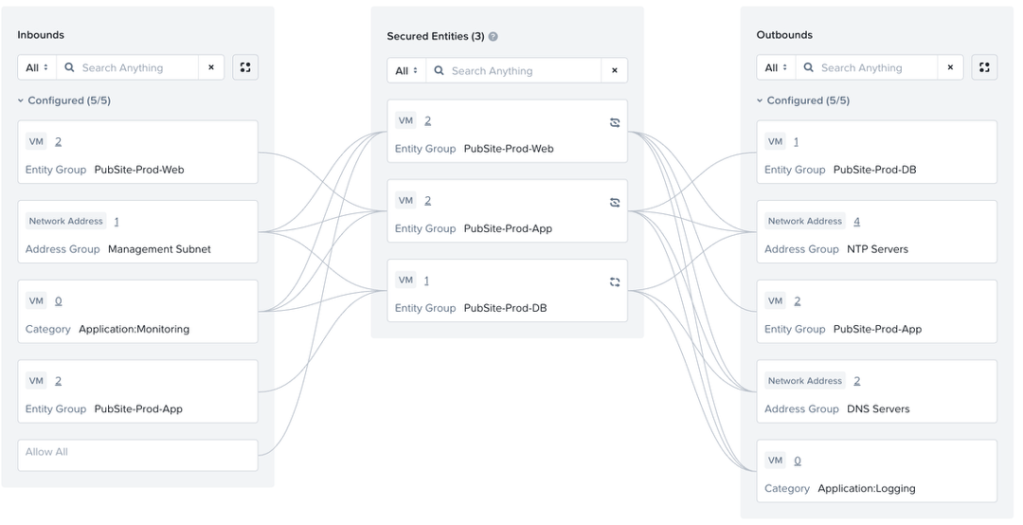
We can create an application policy called PubSite-Production, and we’ll fill in what we know. We’ll define our Secured Entities, which would be our PubSite-Prod-Web, PubSite-Prod-App, and PubSite-Prod-DB entity groups. When defining those entities, we need to assign the Intra-Tier Rule for each. If we know, for instance, whether our web servers need to communicate, we can define that traffic. For now, let’s assume we don’t know whether this is needed for our tiers, so let’s set all three entities to Deny All Traffic for now.
We can then add the inbounds and outbounds that we know about. We can add our Application:Monitoring category and our Management Subnet address group as Inbound Sources, and our Application:Logging category and DNS Serversand NTP Servers address groups as Outbound Destinations. We can then build our Inbound and Outbound rules. If we know what traffic should be allowed for those rules, (such as our DNS and NTP traffic), we can specify it. If we don’t, we can set the rule to what we think might be required (for instance, allowing syslog traffic to our logging servers), or something we can use temporarily, like enabling ICMP, and our Monitor policy will let us know that there is traffic that would be blocked, alerting us to update the rule. Finally, we know that our web servers accept inbound traffic on HTTP and HTTPS from anywhere, so we can add Allow All as an Inbound Source, with a rule allowing that traffic to our Web servers.
This is our starting point for putting the rule in Monitor Mode. Here is the “boxes and lines” visualization.

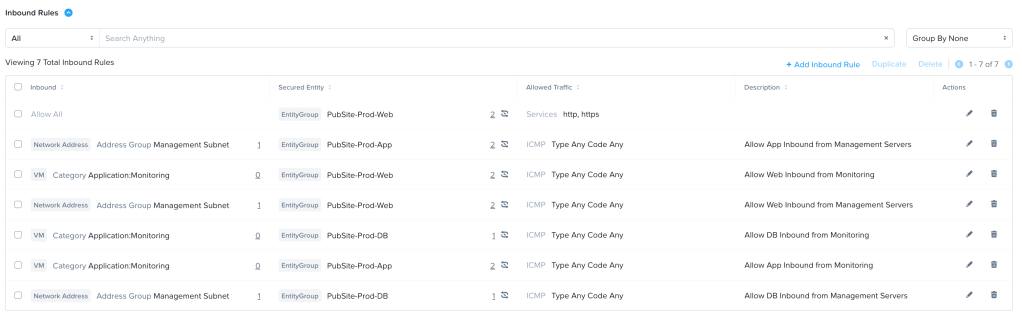
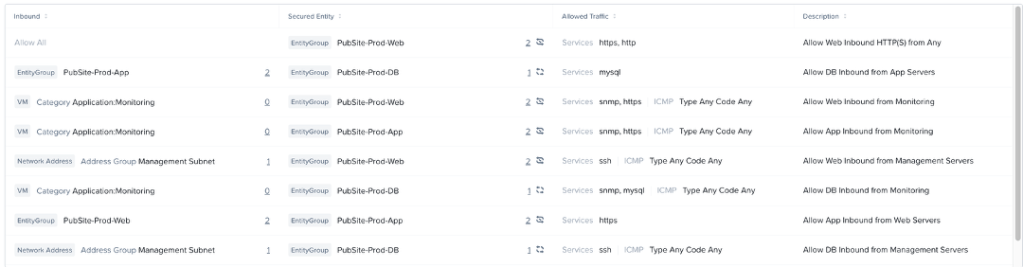
Here are the Inbound, Outbound, and Intra-Tier Rules in List format.


As the monitoring goes on, we go back to our policy and we’ll start seeing visualization data show up. For instance, we’ve let our application run for a few hours and we see this particular traffic flow in the list of Outbound Discovered Traffic:

We know that destination IP is one of our database servers, and so this is showing our App server is communicating with our Database servers on port 3306, the MySQL port. We investigate this traffic and determine it is valid and expected, so we need to add the appropriate rules. Because this is traffic between Secured Entities, so we need to account for allowing both the traffic outbound from PubSite-Prod-App servers as well as the traffic inbound to PubSite-Prod-DB. So, we’ll add PubSite-Prod-App as an Inbound Source for PubSite-Prod-DB with a rule allowing the mysql service, and we’ll add PubSite-Prod-DB as an Outbound Destination for PubSite-Prod-App, also allowing the mysql service.
We see similar flows showing traffic between Web and App on TCP-443, so we’ll add PubSite-Prod-Web as an Inbound Source for PubSite-Prod-App, and PubSite-Prod-App as an Outbound Destination for PubSite-Prod-Web, both allowing the HTTPS service.
Finally, we also see traffic between the DB servers on TCP-3306. This is identified as valid database replication traffic. For this, we can edit the Intra-Tier Rule for PubSite-Prod-DB enabling the mysql service between VMs in the tier.
After adding all of our discovered traffic, we end up with something like this:
Inbound Rules List:

Outbound Rules List:


Intra-Tier Rules:

With this completed, we can also clone this policy for our PubSite-Dev policy, swapping out the Prod Entity Groups with our Dev Entity Groups.
Enforce and Test
With what we believe to be a complete and accurate ruleset for this application, we can switch our rule from Monitor mode to Enforce mode. Ideally, we would do this with our Dev servers first, and then again with our Prod servers in a pre-defined testing window with teams ready to put the application through its’ paces.
In Enforce mode, we get similar visualizations for blocked traffic as we do for observed traffic in Monitor mode. If during testing, issues arise, we can refer to the visualization to see if there is additional traffic that was not added to the rule. Additionally, we can quickly look at a policy to see if there is unexpected traffic that might indicate an issue or misconfiguration on a server. For example, below we see that one of our App servers has tried to communicate with an unexpected IP on the DNS port TCP-53:

We can take this information to the team that manages the server and determine whether the server is configured with the wrong DNS server, or whether we need to add this additional server to our DNS Servers address list. This visualization shows all blocked traffic from the past 24 hours.
What About Public Internet Access?
This particular application does not require any outbound internet access. However, many do! Presently, Flow Network Security does not allow DNS-based destinations, and the proliferation of CDNs and globally distributed applications makes it difficult to define internet destinations solely by IP address. Additionally, in most cases, we’re doing deeper inspection of internet traffic at a perimeter firewall, with features such as category filtering, SSL inspection, and data-loss prevention.
In this case, one potential solution is to create a Network Address group for Public Subnets, defining the known public IP space. To define this Public Subnets group, we can use the following 9 IP ranges:
- 1.0.0.0 – 9.255.255.255
- 11.0.0.0 – 126.255.255.255
- 129.0.0.0 – 169.253.255.255
- 169.255.0.0 – 172.15.255.255
- 172.32.0.0 – 191.0.1.255
- 192.0.3.0 – 192.88.98.255
- 192.88.100.0 – 192.167.255.255
- 192.169.0.0 – 198.17.255.255
- 198.20.0.0 – 223.255.255.255
We can then allow outbound access via HTTP, HTTPS, and any other chosen protocols. This traffic to Internet IPs will eventually end up at our perimeter firewall, where it can be appropriately inspected and allowed or denied.
Other options do exist, such as:
- using web proxy servers as a single point of internet egress
- using Service Insertion to redirect internet traffic through VM-based firewalls
Wrapping Things Up
Hopefully this guide gives you a place to start securing your applications with Flow Network Security. This Discover->Categorize->Monitor->Enforce framework should enable you to confidently start securing your environment at your pace. Of course, our Professional Services team (that’s me!) also is available with services around both policy design and deployment. Your account team can provide you with any information around those or any other services.
- Entity Groups are a new construct available only in FNS 5.2+. ↩︎
- Starting in FNS 5.2, the Intra-Tier rule can be specified to only allow specific ports/protocols/services ↩︎
- Subnets as an inbound, outbound, or secured entity is only available in FNS 5.2+. ↩︎
- VPCs as an inbound, outbound, or secured entity is only available in FNS 5.2+. ↩︎
- The AppTier Category heading already exists; we will only need to add Web, App, and DB as possible values. ↩︎
